摄像头实验
前言
本章实验将介绍如何使用TuyaOpen让T5驱动camera(OV2640),并把图像显示在LCD上。
操作流程
使用camera组件,需要打开camera的使能宏,操作如下:
tos.py config menu
然后到configure device driver中使能camera。

还需要选择对应的摄像头,OV2640。

记得最后要保存。
方便快捷直接使用 tos.py config choice命令选择生成好的配置文件。
摄像头驱动介绍
概述
TuyaOpen CAMERA 组件是一个高度抽象化的统一管理接口,旨在解决不同型号摄像头在硬件能力、通信协议和数据格式上的差异。它为上层应用提供了一套标准化的API,从而实现对各类摄像头设备的无缝接入、功能调用和集中管控。
API 描述
1,tdl_camera_find_dev函数
查找摄像头设备。
TDL_CAMERA_HANDLE_T tdl_camera_find_dev(char *name);
1.1 参数描述
name:摄像头名称
1.2 返回值
OPRT_OK表示解码成功,其他表示解码失败。
2,tdl_camera_dev_open函数
打开摄像头设备。
OPERATE_RET tdl_camera_dev_open(TDL_CAMERA_HANDLE_T camera_hdl, TDL_CAMERA_CFG_T *cfg);
2.1 参数描述
camera_hdl:摄像头句柄
cfg:参数配置。
/* 摄像头输出格式类型 */
typedef enum {
    TDL_CAMERA_FMT_YUV422 = 1,
    TDL_CAMERA_FMT_JPEG = ENCODED_SHIFT(1),
    TDL_CAMERA_FMT_H264 = ENCODED_SHIFT(2),
    TDL_CAMERA_FMT_JPEG_YUV422_BOTH =  (TDL_CAMERA_FMT_JPEG | TDL_CAMERA_FMT_YUV422),
    TDL_CAMERA_FMT_H264_YUV422_BOTH =  (TDL_CAMERA_FMT_H264 | TDL_CAMERA_FMT_YUV422),
} TDL_CAMERA_FMT_E;

typedef OPERATE_RET (*TDL_CAMERA_GET_FRAME_CB)(TDL_CAMERA_HANDLE_T hdl,  TDL_CAMERA_FRAME_T *frame);

typedef struct {
    uint16_t                  fps;                  /* 输出帧率 */
    uint16_t                  width;                /* 输出宽度 */
    uint16_t                  height;               /* 输出高度 */
    TDL_CAMERA_FMT_E          out_fmt;              /* 输出格式 */
    TDL_CAMERA_GET_FRAME_CB   get_frame_cb;         /* 回调解码函数 */
    TDL_CAMERA_GET_FRAME_CB   get_encoded_frame_cb; /* 图像编码回调函数 */
}TDL_CAMERA_CFG_T;
2.2 返回值
OPRT_OK表示成功,其他表示失败。
3,tkl_dma2d_init函数
DMA2D初始化。
OPERATE_RET tkl_dma2d_init(CONST TUYA_DMA2D_BASE_CFG_T *cfg);
3.1 参数描述
cfg:DMA2D基础配置
typedef VOID_T (*TUYA_DMA2D_IRQ_CB)(TUYA_DMA2D_IRQ_E type, VOID_T *args);

/**
 * @brief dma2d interrupt config
 */
typedef struct {
    TUYA_DMA2D_IRQ_CB     cb;	/* DMA2D回调函数 */
    VOID_T              *arg;	/* DMA2D回调函数传入参数 */
} TUYA_DMA2D_BASE_CFG_T;
3.2 返回值:
OPRT_OK表示成功,其他表示失败。
4,tkl_dma2d_convert函数
格式转换。
OPERATE_RET tkl_dma2d_convert(TKL_DMA2D_FRAME_INFO_T *src, TKL_DMA2D_FRAME_INFO_T *dst);
4.1 参数描述
src:源图像数据
dst:目标图像输出配置参数
typedef struct
{
    UINT16_T      x_axis;
    UINT16_T      y_axis;
}TKL_DMA2D_POINT_T;

typedef struct
{
    TUYA_FRAME_FMT_E type;                           	/* 转换类型 */
    uint8_t     *pbuf;                                	/* 转转后存储的地址 */
    UINT16_T     width;                                	/* 宽度 */
    UINT16_T     height;                               	/* 高度 */
    TKL_DMA2D_POINT_T  axis;                         	/* 坐标偏移 */
    UINT16_T     width_cp;
    UINT16_T     height_cp;
}TKL_DMA2D_FRAME_INFO_T;
4.2 返回值:
OPRT_OK表示成功,其他表示失败。
5,tkl_dma2d_convert函数
是否需要两个字节转换。
OPERATE_RET tdl_disp_dev_rgb565_swap(uint16_t *data, uint32_t len);
5.1 参数描述
data:需要转换的数据
len:需要转换的大小(像素的个数)
5.2 返回值:
OPRT_OK��表示成功,其他表示失败。
硬件设计
例程功能
1,测试摄像头驱动,并把图像显示在LCD上。
硬件资源
1,RGBLCD
LCD_R3: P23
LCD_R4: P22
LCD_R5: P21
LCD_R6: P20
LCD_R7: P19
LCD_G2: P42
LCD_G3: P41
LCD_G4: P40
LCD_G5: P26
LCD_G6: P25
LCD_G7: P24
LCD_B3: P47
LCD_B4: P46
LCD_B5: P45
LCD_B6: P44
LCD_B7: P43
LCD_PCLK: P14
LCD_DE: P16
LCD_BL: P9
LCD_RST: P27
2,SPILCD
DC/WR: P42
RST: P43
CS: P45
SCK: P44
SDA: P46
BL/PWR: P9
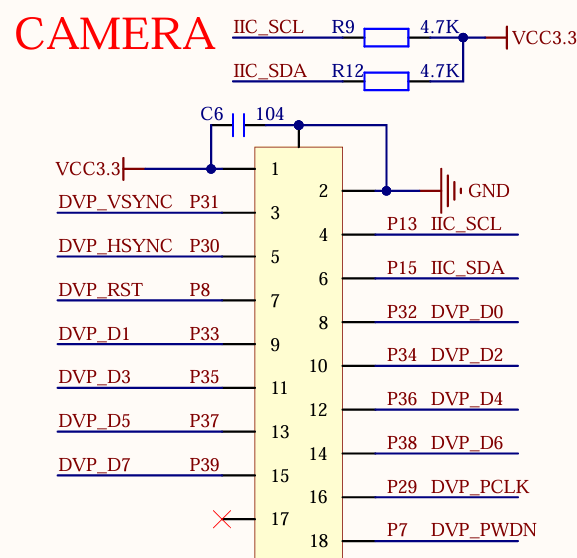
3,CAMERA
DVP_VSYNC:P31
DVP_HSYNC:P30
DVP_RST:P8
DVP_D0:P32
DVP_D1:P33
DVP_D2:P34
DVP_D3:P35
DVP_D4:P36
DVP_D5:P37
DVP_D6:P38
DVP_D7:P39
DVP_PCLK:P29
DVP_PWDN:P7
IIC_SCL:P13
IIC_SDA:P15
原理图
正点原子T5 AI开发板上CAMERA的连接原理图,如下图所示。
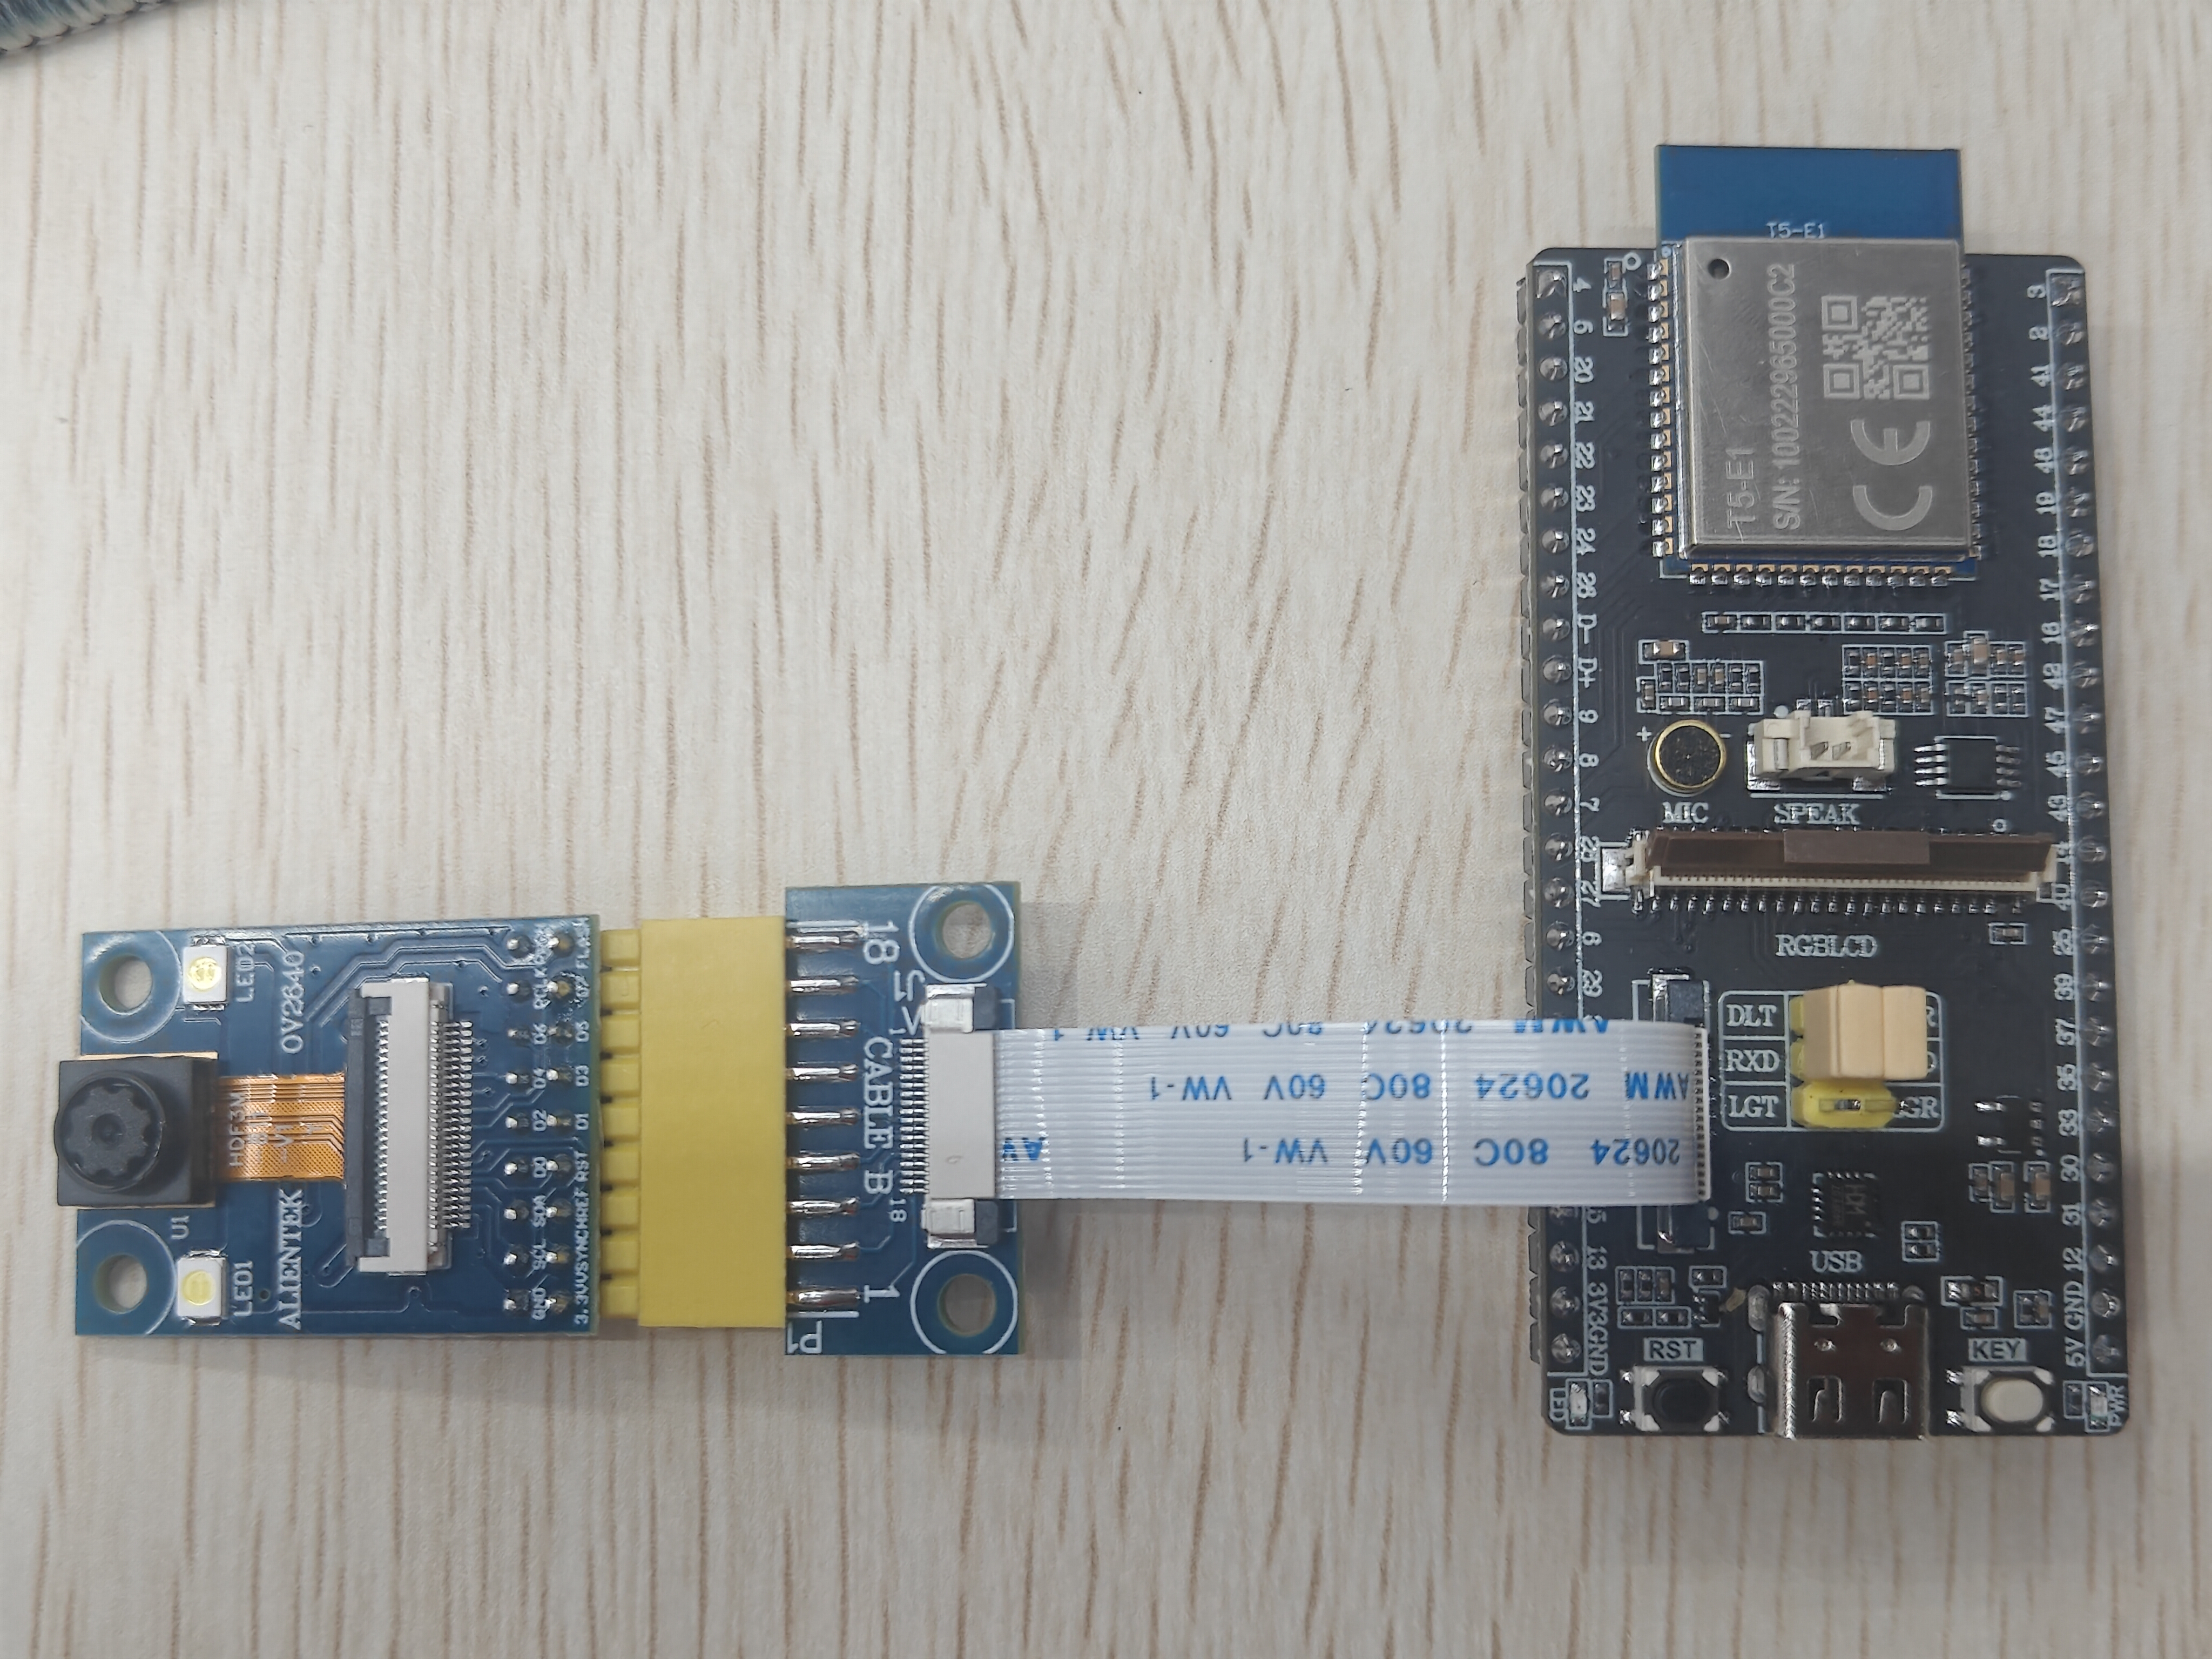
摄像头接线图如下所示。
程序设计
1,CAMERA驱动代码
这里我们只讲解核心代码,详细的源码请大家参考光盘资料本实验对应的源码。CAMERA驱动源码包括两个文件:camera.c和camera.h
camera.h文件是对函数声明。
/* Function Declaration */
OPERATE_RET camera_init(void);
camera.c文件是对摄像头初始化且完成摄像头数据显示在屏幕上的操作。
#if defined(ATK_T5AI_MINI_BOARD_LCD_MD0700R_RGB)
#define CAMERA_FPS                20
#define CAMERA_WIDTH              480
#define CAMERA_HEIGHT             480
#else
#define CAMERA_FPS                40
#define CAMERA_WIDTH              240
#define CAMERA_HEIGHT             240
#endif

extern TDL_DISP_HANDLE_T sg_tdl_disp_hdl;
extern TDL_DISP_FRAME_BUFF_T *sg_p_display_fb;
extern TDL_DISP_DEV_INFO_T sg_display_info;
static TDL_CAMERA_HANDLE_T sg_tdl_camera_hdl = NULL;

#if defined(ENABLE_DMA2D) && (ENABLE_DMA2D == 1)
static TKL_DMA2D_FRAME_INFO_T sg_in_frame = {0};
static TKL_DMA2D_FRAME_INFO_T sg_out_frame = {0};
static SEM_HANDLE sg_convert_sem;
#endif

/**
 * @brief       camera frame callback
 * @param[in]   hdl:camera handle
 * @param[in]   frame:camera frame
 * @return      OPERATE_RET
 */
OPERATE_RET __get_camera_raw_frame_cb(TDL_CAMERA_HANDLE_T hdl,  TDL_CAMERA_FRAME_T *frame)
{
    (void)hdl;

#if defined(ENABLE_DMA2D) && (ENABLE_DMA2D == 1)
    /* Calculate offset to center camera image on screen */
    int x_offset = (sg_p_display_fb->width - CAMERA_WIDTH) / 2;
    int y_offset = (sg_p_display_fb->height - CAMERA_HEIGHT) / 2;

    /* Input frame: YUV422 from camera */
    sg_in_frame.type = TUYA_FRAME_FMT_YUV422;
    sg_in_frame.width = CAMERA_WIDTH;
    sg_in_frame.height = CAMERA_HEIGHT;
    sg_in_frame.axis.x_axis = 0;
    sg_in_frame.axis.y_axis = 0;
    sg_in_frame.width_cp = CAMERA_WIDTH;
    sg_in_frame.height_cp = CAMERA_HEIGHT;
    sg_in_frame.pbuf = frame->data;

    /* Output frame: RGB565 to display buffer (centered) */
    sg_out_frame.type = TUYA_FRAME_FMT_RGB565;
    sg_out_frame.width = sg_p_display_fb->width;
    sg_out_frame.height = sg_p_display_fb->height;
    sg_out_frame.axis.x_axis = x_offset > 0 ? x_offset : 0;
    sg_out_frame.axis.y_axis = y_offset > 0 ? y_offset : 0;
    sg_out_frame.width_cp = CAMERA_WIDTH;
    sg_out_frame.height_cp = CAMERA_HEIGHT;
    sg_out_frame.pbuf = sg_p_display_fb->frame;

    tkl_dma2d_convert(&sg_in_frame, &sg_out_frame); /* convert yuv422 to rgb565 */

    tal_semaphore_wait_forever(sg_convert_sem);     /* wait dma2d convert done */

    if(sg_display_info.is_swap)
    {
        tdl_disp_dev_rgb565_swap((uint16_t *)sg_p_display_fb->frame, sg_p_display_fb->len/2);    /* swap rgb565 */
    }

    tdl_disp_dev_flush(sg_tdl_disp_hdl, sg_p_display_fb);    /* display frame */
#endif

    return OPRT_OK;
}

#if defined(ENABLE_DMA2D) && (ENABLE_DMA2D == 1)
/**
 * @brief       dma2d irq callback
 * @param[in]   type:irq type
 * @param[in]   args: args
 * @return      none
 */
static void __dma2d_irq_cb(TUYA_DMA2D_IRQ_E type, VOID_T *args)
{
    (void)type;
    (void)args;

    if(sg_convert_sem) {
        tal_semaphore_post(sg_convert_sem);
    }
}

/**
 * @brief dma2d init
 * @param[in] None
 * @return none
 */
static OPERATE_RET __dma2d_init(void)
{
    OPERATE_RET rt = OPRT_OK;

    TUYA_CALL_ERR_RETURN(tal_semaphore_create_init(&sg_convert_sem, 0, 1)); /* create semaphore */

    TUYA_DMA2D_BASE_CFG_T dma2d_cfg = {
        .cb = __dma2d_irq_cb,
        .arg=NULL,
    };

    return tkl_dma2d_init(&dma2d_cfg);  /* init dma2d */
}
#endif

/**
 * @brief       camera init
 * @param[in]   None
 * @retval      OPRT_OK:success
 */
OPERATE_RET camera_init(void)
{
    OPERATE_RET rt = OPRT_OK;
    TDL_CAMERA_CFG_T cfg;

#if defined(ENABLE_DMA2D) && (ENABLE_DMA2D == 1)
    TUYA_CALL_ERR_LOG(__dma2d_init());
#endif

    sg_tdl_camera_hdl = tdl_camera_find_dev(CAMERA_NAME);   /* Find camera device */
    if(NULL == sg_tdl_camera_hdl) {
        PR_ERR("camera dev %s not found", CAMERA_NAME);
        return OPRT_NOT_FOUND;
    }

    /* Camera configuration */
    cfg.fps     = CAMERA_FPS;
    cfg.width   = CAMERA_WIDTH;
    cfg.height  = CAMERA_HEIGHT;
    cfg.out_fmt = TDL_CAMERA_FMT_YUV422;
    cfg.get_frame_cb = __get_camera_raw_frame_cb;

    TUYA_CALL_ERR_RETURN(tdl_camera_dev_open(sg_tdl_camera_hdl, &cfg)); /* Open camera device */

    return OPRT_OK;
}
上述源码中,camera_init函数用来初始化摄像头,然后__get_camera_raw_frame_cb函数用来更新图像数据到屏幕上,还有dma2d使能的一些函数。
2,CMakeLists.txt文件
CMakeLists.txt文件配置内容如下。
# Add Driver
set(src_dirs
    TFTLCD		# 添加驱动组件
    CAMERA
)

foreach(dir ${src_dirs})
    set(SRC_DIR ${APP_PATH}/components/BSP/${dir})
    aux_source_directory(${SRC_DIR} DRIVE_SRC)
    target_sources(${EXAMPLE_LIB}
        PRIVATE
            ${DRIVE_SRC}
    )
    target_include_directories(${EXAMPLE_LIB}
        PRIVATE
            ${SRC_DIR}
    )
endforeach()
3,main.c驱动代码
在main.c里面编写如下代码。
#include "tal_api.h"
#include "tkl_output.h"
#include "board_com_api.h"

#include "tftlcd.h"
#include "camera.h"

/**
 * @brief       user_main
 *
 * @param[in]   param:Task parameters
 * @return      none
 */
void user_main(void)
{
    tal_log_init(TAL_LOG_LEVEL_DEBUG, 1024, (TAL_LOG_OUTPUT_CB)tkl_log_output); /* Initialize log output */
    tdd_disp_atk_tftlcd_register();    /* Register the TFTLCD LCD display */

    tftlcd_show_string(30, 50, 200, 16, 16, "T5 MINI Board", RED);
    tftlcd_show_string(30, 70, 200, 16, 16, "CAMERA TEST", RED);
    tftlcd_show_string(30, 90, 200, 16, 16, "ATOM@ALIENTEK", RED);

    camera_init();

    while(1)
    {
        tal_system_sleep(1000);
    }

}

/**
 * @brief       main
 *
 * @param       argc
 * @param       argv
 * @return      none
 */
#if OPERATING_SYSTEM == SYSTEM_LINUX
void main(int argc, char *argv[])
{
    user_main();

    while (1) {
        tal_system_sleep(500);
    }
}
#else

/**
 * @brief       main
 * @param[in]   None
 * @return      none
 */
void tuya_app_main(void)
{
    user_main();
}
#endif
从user_main函数可以看到,首先初始化屏幕,后面初始化摄像头。
运行验证
程序下载完成后,LCD上显示摄像头图像。