局部放大器实验
前言
在上一章节中,我们已经学习了如何在CanMV下使用CanMV AI视觉开发框架和MicroPython编程方法实现动态手势识别的功能,本章将通过局部放大器实验,介绍如何使用CanMV AI视觉开发框架和MicroPython编程完成手掌的骨骼关键点的检测并实现手指特定区域图像的放大功能。本实验由手掌关键点检测实验扩展而来,使用到的AI模型是一致的,我们首先采集摄像头捕获的图像,然后经过图像预处理、模型推理和输出处理结果等一系列步骤,完成手掌检测的功能,然后在检测到手掌的区域,进一步使用手掌关键点检测模型进行推理,从而得到每个手掌的21个手掌骨骼关键点位置,接着再根据手掌的21个骨骼关键点的分布判断手掌的拇指和中指位置,然后将拇指和中指的区域放大并覆盖掉原图像,绘制并显示到显示器上。通过本章的学习,读者将掌握如何在CanMV下使用CanMV AI视觉开发框架和MicroPython编程方法实现局部放大器的方法。
AI开发框架介绍
为了简化AI开发流程并降低AI开发难度,CanMV官方针对K230D专门搭建了AI开发框架,有关AI开发框架的介绍,请见CanMV AI��开发框架
硬件设计
例程功能
- 获取摄像头输出的图像,然后将图像输入到CanMV K230D的AI模型进行推理。本实验使用了两个AI模型:一个是前面章节使用到的手掌检测模型,另一个是手掌关键点检测模型。手掌检测模型负责找出图像中的手掌区域,然后将该区域传递给手掌关键点检测模型进行手掌关键点位置的推理。手掌关键点检测模型能将输入模型的手掌图进行检测,然后对检测到的每一个手掌进行关键点回归得到21个手掌骨骼关键点位置,再根据21个手掌的骨骼关键点识别出手的拇指和中指,然后将拇指和中指的区域放大并覆盖原图像。最后,将处理后的图像显示在LCD上。
硬件资源
- 本章实验内容主要讲解K230D的神经网络加速器KPU的使用,无需关注硬件资源。
原理图
- 本章实验内容主要讲解K230D的神经网络加速器KPU的使用,无需关注原理图。
实验代码
from libs.PipeLine import PipeLine, ScopedTiming
from libs.AIBase import AIBase
from libs.AI2D import Ai2d
import os
import ujson
from media.media import *
from media.sensor import *
from time import *
import nncase_runtime as nn
import ulab.numpy as np
import time
import image
import aicube
import random
import gc
import sys
# 自定义手掌检测任务类
class HandDetApp(AIBase):
def __init__(self,kmodel_path,labels,model_input_size,anchors,confidence_threshold=0.2,nms_threshold=0.5,nms_option=False, strides=[8,16,32],rgb888p_size=[1920,1080],display_size=[1920,1080],debug_mode=0):
super().__init__(kmodel_path,model_input_size,rgb888p_size,debug_mode)
# kmodel路径
self.kmodel_path=kmodel_path
self.labels=labels
# 检测模型输入分辨率
self.model_input_size=model_input_size
# 置信度阈值
self.confidence_threshold=confidence_threshold
# nms阈值
self.nms_threshold=nms_threshold
self.anchors=anchors
self.strides = strides # 特征下采样倍数
self.nms_option = nms_option # NMS选项,如果为True做类间NMS,如果为False做类内NMS
# sensor给到AI的图像分辨率,宽16字节对齐
self.rgb888p_size=[ALIGN_UP(rgb888p_size[0],16),rgb888p_size[1]]
# 视频输出VO分辨率,宽16字节对齐
self.display_size=[ALIGN_UP(display_size[0],16),display_size[1]]
# debug模式
self.debug_mode=debug_mode
self.ai2d=Ai2d(debug_mode)
self.ai2d.set_ai2d_dtype(nn.ai2d_format.NCHW_FMT,nn.ai2d_format.NCHW_FMT,np.uint8, np.uint8)
def config_preprocess(self,input_image_size=None):
with ScopedTiming("set preprocess config",self.debug_mode > 0):
# 初始化ai2d预处理配置,默认为sensor给到AI的尺寸,可以通过设置input_image_size自行修改输入尺寸
ai2d_input_size = input_image_size if input_image_size else self.rgb888p_size
# 计算padding参数并应用pad操作,以确保输入图像尺寸与模型输入尺寸匹配
top, bottom, left, right = self.get_padding_param()
self.ai2d.pad([0, 0, 0, 0, top, bottom, left, right], 0, [114, 114, 114])
# 使用双线性插值进行resize操作,调整图像尺寸以符合模型输入要求
self.ai2d.resize(nn.interp_method.tf_bilinear, nn.interp_mode.half_pixel)
# 构建预处理流程
self.ai2d.build([1,3,ai2d_input_size[1],ai2d_input_size[0]],[1,3,self.model_input_size[1],self.model_input_size[0]])
# 自定义后处理,results是模型输出的array列表,这里使用了aicube库的anchorbasedet_post_process接口
def postprocess(self,results):
with ScopedTiming("postprocess",self.debug_mode > 0):
dets = aicube.anchorbasedet_post_process(results[0], results[1], results[2], self.model_input_size, self.rgb888p_size, self.strides, len(self.labels), self.confidence_threshold, self.nms_threshold, self.anchors, self.nms_option)
# 返回手掌检测结果
return dets
# 计算padding参数,确保输入图像尺寸与模型输入尺寸匹配
def get_padding_param(self):
# 根据目标宽度和高度计算比例因子
dst_w = self.model_input_size[0]
dst_h = self.model_input_size[1]
input_width = self.rgb888p_size[0]
input_high = self.rgb888p_size[1]
ratio_w = dst_w / input_width
ratio_h = dst_h / input_high
# 选择较小的比例因子,以确保图像内容完整
if ratio_w < ratio_h:
ratio = ratio_w
else:
ratio = ratio_h
# 计算新的宽度和高度
new_w = int(ratio * input_width)
new_h = int(ratio * input_high)
# 计算宽度和高度的差值,并确定padding的位置
dw = (dst_w - new_w) / 2
dh = (dst_h - new_h) / 2
top = int(round(dh - 0.1))
bottom = int(round(dh + 0.1))
left = int(round(dw - 0.1))
right = int(round(dw + 0.1))
return top, bottom, left, right
# 自定义手势关键点分类任务类
class HandKPClassApp(AIBase):
def __init__(self,kmodel_path,model_input_size,rgb888p_size=[1920,1080],display_size=[1920,1080],debug_mode=0):
super().__init__(kmodel_path,model_input_size,rgb888p_size,debug_mode)
# kmodel路径
self.kmodel_path=kmodel_path
# 检测模型输入分辨率
self.model_input_size=model_input_size
# sensor给到AI的图像分辨率,宽16字节对齐
self.rgb888p_size=[ALIGN_UP(rgb888p_size[0],16),rgb888p_size[1]]
# 视频输出VO分辨率,宽16字节对齐
self.display_size=[ALIGN_UP(display_size[0],16),display_size[1]]
self.crop_params=[]
# debug模式
self.debug_mode=debug_mode
self.ai2d=Ai2d(debug_mode)
self.ai2d.set_ai2d_dtype(nn.ai2d_format.NCHW_FMT,nn.ai2d_format.NCHW_FMT,np.uint8, np.uint8)
# 配置预处理操作,这里使用了crop和resize,Ai2d支持crop/shift/pad/resize/affine
def config_preprocess(self,det,input_image_size=None):
with ScopedTiming("set preprocess config",self.debug_mode > 0):
# 初始化ai2d预处理配置,默认为sensor给到AI的尺寸,可以通过设置input_image_size自行修改输入尺寸
ai2d_input_size=input_image_size if input_image_size else self.rgb888p_size
self.crop_params = self.get_crop_param(det)
self.ai2d.crop(self.crop_params[0],self.crop_params[1],self.crop_params[2],self.crop_params[3])
self.ai2d.resize(nn.interp_method.tf_bilinear, nn.interp_mode.half_pixel)
self.ai2d.build([1,3,ai2d_input_size[1],ai2d_input_size[0]],[1,3,self.model_input_size[1],self.model_input_size[0]])
# 自定义后处理,results是模型输出的array列表,返回手部关键点
def postprocess(self,results):
with ScopedTiming("postprocess",self.debug_mode > 0):
results=results[0].reshape(results[0].shape[0]*results[0].shape[1])
results_show = np.zeros(results.shape,dtype=np.int16)
results_show[0::2] = (results[0::2] * self.crop_params[3] + self.crop_params[0])
results_show[1::2] = (results[1::2] * self.crop_params[2] + self.crop_params[1])
return results_show
# 计算crop参数
def get_crop_param(self,det_box):
x1, y1, x2, y2 = det_box[2],det_box[3],det_box[4],det_box[5]
w,h= int(x2 - x1),int(y2 - y1)
w_det = int(float(x2 - x1) * self.display_size[0] // self.rgb888p_size[0])
h_det = int(float(y2 - y1) * self.display_size[1] // self.rgb888p_size[1])
x_det = int(x1*self.display_size[0] // self.rgb888p_size[0])
y_det = int(y1*self.display_size[1] // self.rgb888p_size[1])
length = max(w, h)/2
cx = (x1+x2)/2
cy = (y1+y2)/2
ratio_num = 1.26*length
x1_kp = int(max(0,cx-ratio_num))
y1_kp = int(max(0,cy-ratio_num))
x2_kp = int(min(self.rgb888p_size[0]-1, cx+ratio_num))
y2_kp = int(min(self.rgb888p_size[1]-1, cy+ratio_num))
w_kp = int(x2_kp - x1_kp + 1)
h_kp = int(y2_kp - y1_kp + 1)
return [x1_kp, y1_kp, w_kp, h_kp]
class SpaceResize:
def __init__(self,hand_det_kmodel,hand_kp_kmodel,det_input_size,kp_input_size,labels,anchors,confidence_threshold=0.25,nms_threshold=0.3,nms_option=False,strides=[8,16,32],rgb888p_size=[1280,720],display_size=[1920,1080],debug_mode=0):
# 手掌检测模型路径
self.hand_det_kmodel=hand_det_kmodel
# 手掌关键点模型路径
self.hand_kp_kmodel=hand_kp_kmodel
# 手掌检测模型输入分辨率
self.det_input_size=det_input_size
# 手掌关键点模型输入分辨率
self.kp_input_size=kp_input_size
self.labels=labels
# anchors
self.anchors=anchors
# 置信度阈值
self.confidence_threshold=confidence_threshold
# nms阈值
self.nms_threshold=nms_threshold
self.nms_option=nms_option
self.strides=strides
# sensor给到AI的图像分辨率,宽16字节对齐
self.rgb888p_size=[ALIGN_UP(rgb888p_size[0],16),rgb888p_size[1]]
# 视频输出VO分辨率,宽16字节对齐
self.display_size=[ALIGN_UP(display_size[0],16),display_size[1]]
# debug_mode模式
self.debug_mode=debug_mode
self.first_start = True # 首次手掌入镜参数
self.two_point_left_x = 0 # 中指食指包括范围 x
self.two_point_top_y = 0 # 中指食指包括范围 y
self.two_point_mean_w = 0 # 中指食指首次入镜包括范围 w
self.two_point_mean_h = 0 # 中指食指首次入镜包括范围 h
self.two_point_crop_w = 0 # 中指食指包括范围 w
self.two_point_crop_h = 0 # 中指食指包括范围 h
self.osd_plot_x = 0 # osd 画缩放图起始点 x
self.osd_plot_y = 0 # osd 画缩放图起始点 y
self.ori_new_ratio = 0 # 缩放比例
self.new_resize_w = 0 # 缩放后 w
self.new_resize_h = 0 # 缩放后 h
self.crop_area = 0 # 剪切区域
self.rect_frame_x = 0 # osd绘画起始点 x
self.rect_frame_y = 0 # osd绘画起始点 y
self.masks = np.zeros((self.display_size[1],self.display_size[0],4),dtype=np.uint8)
self.mask_img=image.Image(self.display_size[0], self.display_size[1], image.ARGB8888,alloc=image.ALLOC_REF,data=self.masks)
self.hand_det=HandDetApp(self.hand_det_kmodel,self.labels,model_input_size=self.det_input_size,anchors=self.anchors,confidence_threshold=self.confidence_threshold,nms_threshold=self.nms_threshold,nms_option=self.nms_option,strides=self.strides,rgb888p_size=self.rgb888p_size,display_size=self.display_size,debug_mode=0)
self.hand_kp=HandKPClassApp(self.hand_kp_kmodel,model_input_size=self.kp_input_size,rgb888p_size=self.rgb888p_size,display_size=self.display_size)
self.ai2d=Ai2d(debug_mode)
self.ai2d.set_ai2d_dtype(nn.ai2d_format.NCHW_FMT,nn.ai2d_format.RGB_packed,np.uint8, np.uint8)
self.hand_det.config_preprocess()
# 对��输入数据做预处理,对拇指和中指部分做裁剪并做resize
def imgprocess(self,input_np,x,y,w,h,out_w,out_h):
self.ai2d.crop(x, y, w, h)
self.ai2d.resize(nn.interp_method.tf_bilinear, nn.interp_mode.half_pixel )
self.ai2d.build([1,3,self.rgb888p_size[1],self.rgb888p_size[0]],[1,out_h, out_w,3])
return self.ai2d.run(input_np).to_numpy()
# run函数
def run(self,input_np):
# 先进行手掌检测
det_boxes=self.hand_det.run(input_np)
det_res=[]
two_point = np.zeros((4),dtype=np.int16)
for det_box in det_boxes:
# 筛选符合要求的手掌
x1, y1, x2, y2 = det_box[2],det_box[3],det_box[4],det_box[5]
w,h= int(x2 - x1),int(y2 - y1)
if (h<(0.1*self.rgb888p_size[1])):
continue
if (w<(0.25*self.rgb888p_size[0]) and ((x1<(0.03*self.rgb888p_size[0])) or (x2>(0.97*self.rgb888p_size[0])))):
continue
if (w<(0.15*self.rgb888p_size[0]) and ((x1<(0.01*self.rgb888p_size[0])) or (x2>(0.99*self.rgb888p_size[0])))):
continue
det_res.append(det_box)
if len(det_res)!=0:
# 选择第一个手掌做手掌关键点识别,然后裁剪拇指和中指区域做resize并替换原图中的部分
det_box=det_res[0]
self.hand_kp.config_preprocess(det_box)
results_show=self.hand_kp.run(input_np)
two_point[0],two_point[1],two_point[2],two_point[3] = results_show[8],results_show[9],results_show[16+8],results_show[16+9]
if (self.first_start):
if (two_point[0] > 0 and two_point[0] < self.rgb888p_size[0] and two_point[2] > 0 and two_point[2] < self.rgb888p_size[0] and two_point[1] > 0 and two_point[1] < self.rgb888p_size[1] and two_point[3] > 0 and two_point[3] < self.rgb888p_size[1]):
self.two_point_mean_w = np.sqrt(pow(two_point[0] - two_point[2],2) + pow(two_point[1] - two_point[3],2))*0.8
self.two_point_mean_h = np.sqrt(pow(two_point[0] - two_point[2],2) + pow(two_point[1] - two_point[3],2))*0.8
self.first_start = False
else:
self.mask_img.clear()
self.two_point_left_x = int(max((two_point[0] + two_point[2]) / 2 - self.two_point_mean_w / 2, 0))
self.two_point_top_y = int(max((two_point[1] + two_point[3]) / 2 - self.two_point_mean_h / 2, 0))
self.two_point_crop_w = int(min(min((two_point[0] + two_point[2]) / 2 - self.two_point_mean_w / 2 + self.two_point_mean_w , self.two_point_mean_w), self.rgb888p_size[0] - ((two_point[0] + two_point[2]) / 2 - self.two_point_mean_w / 2)))
self.two_point_crop_h = int(min(min((two_point[1] + two_point[3]) / 2 - self.two_point_mean_h / 2 + self.two_point_mean_h , self.two_point_mean_h), self.rgb888p_size[1] - ((two_point[1] + two_point[3]) / 2 - self.two_point_mean_h / 2)))
self.ori_new_ratio = np.sqrt(pow((two_point[0] - two_point[2]),2) + pow((two_point[1] - two_point[3]),2))*0.8 / self.two_point_mean_w
self.new_resize_w = min(int(self.two_point_crop_w * self.ori_new_ratio / self.rgb888p_size[0] * self.display_size[0]),600)
self.new_resize_h = min(int(self.two_point_crop_h * self.ori_new_ratio / self.rgb888p_size[1] * self.display_size[1]),600)
self.rect_frame_x = int(self.two_point_left_x * 1.0 / self.rgb888p_size[0] * self.display_size[0])
self.rect_frame_y = int(self.two_point_top_y * 1.0 / self.rgb888p_size[1] * self.display_size[1])
self.draw_w = min(self.new_resize_w,self.display_size[0]-self.rect_frame_x-1)
self.draw_h = min(self.new_resize_h,self.display_size[1]-self.rect_frame_y-1)
space_np_out = self.imgprocess(input_np, self.two_point_left_x, self.two_point_top_y, self.two_point_crop_w, self.two_point_crop_h, self.new_resize_w, self.new_resize_h) # 运行 隔空缩放检测 ai2d
self.masks[self.rect_frame_y:self.rect_frame_y + self.draw_h,self.rect_frame_x:self.rect_frame_x + self.draw_w,0] = 255
self.masks[self.rect_frame_y:self.rect_frame_y + self.draw_h,self.rect_frame_x:self.rect_frame_x + self.draw_w,1:4] = space_np_out[0][0:self.draw_h,0:self.draw_w,:]
return det_res
# 绘制效果
def draw_result(self,pl,det_res):
pl.osd_img.clear()
if len(det_res)==1:
pl.osd_img.copy_from(self.mask_img)
else:
pl.osd_img.draw_string_advanced((self.display_size[0]//2),(self.display_size[1]//2),32,"请保证一只手入镜!",color=(255,0,0))
if __name__=="__main__":
# 显示模式,默认"lcd"
display_mode="lcd"
display_size=[640,480]
# 手掌检测模型路径
hand_det_kmodel_path="/sdcard/examples/kmodel/hand_det.kmodel"
# 手掌关键点模型路径
hand_kp_kmodel_path="/sdcard/examples/kmodel/handkp_det.kmodel"
anchors_path="/sdcard/examples/utils/prior_data_320.bin"
rgb888p_size=[1024,768]
hand_det_input_size=[512,512]
hand_kp_input_size=[256,256]
confidence_threshold=0.2
nms_threshold=0.5
labels=["hand"]
anchors = [26,27, 53,52, 75,71, 80,99, 106,82, 99,134, 140,113, 161,172, 245,276]
# 初始化PipeLine,只关注传给AI的图像分辨率,显示的分辨率
sensor = Sensor(width=1280, height=960) # 构建摄像头对象
pl = PipeLine(rgb888p_size=rgb888p_size, display_size=display_size, display_mode=display_mode)
pl.create(sensor=sensor) # 创建PipeLine实例
sr=SpaceResize(hand_det_kmodel_path,hand_kp_kmodel_path,det_input_size=hand_det_input_size,kp_input_size=hand_kp_input_size,labels=labels,anchors=anchors,confidence_threshold=confidence_threshold,nms_threshold=nms_threshold,nms_option=False,strides=[8,16,32],rgb888p_size=rgb888p_size,display_size=display_size)
try:
while True:
os.exitpoint()
with ScopedTiming("total",1):
img=pl.get_frame() # 获取当前帧
det_res=sr.run(img) # 推理当前帧
sr.draw_result(pl,det_res) # 绘制当前帧推理结果
pl.show_image() # 展示当前帧
gc.collect()
except Exception as e:
sys.print_exception(e)
finally:
sr.hand_det.deinit()
sr.hand_kp.deinit()
pl.destroy()
可以看到首先是定义显示模式、图像大小、模型相关的一些变量。
接着是通过初始化PipeLine,这里主要初始化sensor和display模块,配置摄像头输出两路不同的格式和大小的图像,以及设置显示模式,完成创建PipeLine实例。
然后调用自定义SpaceResize类构建局部放大器的任务,SpaceResize类会通过调用HandDetApp类和HandKPClassApp类完成对AIBase接口的初始化以及使用Ai2D接口的方法定义手掌检测模型和手掌关键点检测模型输入图像的预处理方法。
最后在一个循环中不断地获取摄像头输出的RGBP888格式的图像帧,然后依次将图像输入到手掌检测模型、手掌关键点检测模型进行推理,进而定位到手的拇指和中指,接着根据手势将拇指和中指区域的图像方法并替换掉原图像,最后在LCD上显示图像。
运行验证
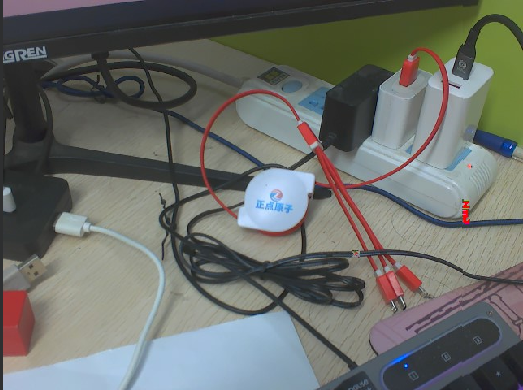
局部放大器实验会将手的拇指和中指区域进行放大,下面我将对充电线上的正点原子品牌logo进行放大,实验原图如下所示:
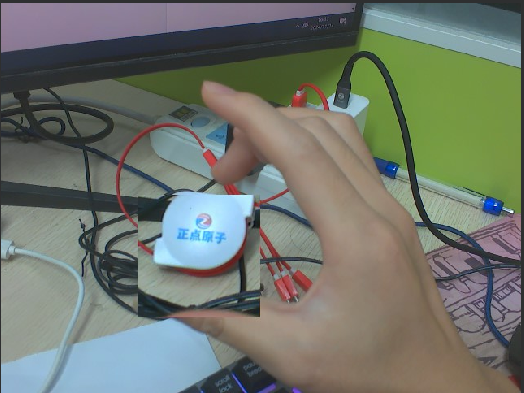
将K230D BOX开发板连接CanMV IDE,点击CanMV IDE上的“开始(运行脚本)”按钮后,将摄像头对准实验原图区域,然后将一只手伸入镜头中,捏合拇指和中指,定位到正点原子品牌logo的位置,张开两指,该区域的放大图像会在两指附近显示出来。随后,在LCD屏幕上可以看到摄像头输出的图像,其中,手的拇指和中指区域被放大并覆盖掉原图像。如下图所示: